Category Archives: Landscape

How to Photograph an Aurora | Katinka Smith Photography

The sun goes through a 12 year cycle with regards to its activity. It goes from very active to very sleepy. The active period is known as Solar maximum and we are in a solar maximum this year (2013). With the VERY exciting solar activity that has occurred in the last few days and the hope and promise of more to come, I asked on my Facebook page if anyone would be interested in a blog post about how to photograph an Aurora. The response was positive, and so here it is.

Firstly I will assume that we already know that an Aurora is possible and that you don’t want to know how Auroras are caused or any of the nerdy technical details of an Aurora. You just want to take photos of the Aurora. OK! (If you do want to know about how an Aurora is CAUSED then this video is fantastic! It is just under 5 minutes and explains it perfectly).

What do you need to photograph an Aurora

  1. A camera. YES! That’s right. You will need a camera that allows you to take manual control of the settings and the focus and push the ISO up.
  2. A fast and wide lens. Honestly you can photograph the Aurora with pretty much any lens, but if you want the ideal set up, then fast and wide is it. The lower the aperture number (ie F2.8) the more light the lens will let in and you will get more light from the Aurora in your image. A wider lens allows you to get more of the sky in your photo (it looks more impressive!) Don’t fret if you don’t have a wide lens, you can always stitch multiple images together into a panorama using photoshop. Though a narrower lens will fill the frame with the Aurora, that can be great too! Experiment with your compositions and have fun!
  3. A tripod – a good sturdy tripod that can actually take the weight of your camera and lens. You will be leaving the shutter open a long time and if your camera moves on the tripod in this time then you will be VERY annoyed – trust me.
  4. Either a remote shutter release or the ability to set a timer on your camera. (this will cut the camera shake from manually pressing the shutter button). I have a release, but I usually just set the camera to a 2 second timer.
  5. Extra batteries and plenty of memory cards. Cold weather can drain batteries faster, so grab an extra one.
  6.  A light. These are fun for lightbombing people called ‘Jo’, but are also useful to being able to see what you are doing in the dark. (don’t really lightbomb people, they will get annoyed. Keep light use to a minimum, and turn it off when you don’t need it. Head lamps with a red option are best (though I don’t have one) ). Phone screens are good minimal light and I used this for a while until I dropped it and smashed in on the rocks, so now I use a head lamp 😉
  7. Warm clothes, beanie, gloves and I find that shoes with a thick sole are the best – cold creeps up through the earth and into our feet very fast and will make you FREEZE. Rug up, it gets cold at night. You don’t want to cut your session short because you get cold. I wear gloves from Kathmandu that have a mit thing that sits over fingerless gloves. So I can easily expose my fingers to change camera settings without removing my whole glove. Yes it really is the smallest things when you are cold! 🙂
  8. A friend to keep you company – in case nothing happens, some patience and a tank of fuel.

 Ready? Ok! Here’s how to do it.

  1. Ok, firstly you need to head somewhere dark and away from city lights/light pollution. At the bottom of this blog post I will give you the three most frequented locations around the Hobart area.
  2. Get your camera on your tripod, set you lens to manual focus and focus on infinity, turn your self timer on, or attach your shutter release. Manually set your white balance – the generally accepted norm is that WB should be set to daylight. People argue about this all of the time, but I find that for me, this produces colours that I consider accurate. For a dark night with no/minimal moon, a good place to start with your settings is:
    –     Aperture – as low as you can go (f2.8 for example)
    –       Shutter speed – around 15 seconds. (If you go longer to about 30 seconds, you might start to get stars beginning to trail and the curtains of the Aurora might blur together into solid colour. So it depends on the effect you want. Experiment and see what you like)
    –       ISO – this is where you make up the balance. Start at ISO of 1000. Take your aperture and shutter speed as a given now and adjust your ISO to let more light in or block light out. If your photo is dark you need to increase ISO, if it is too bright, then reduce your ISO. If you have a low end camera your images will be ‘noisy’ at high ISOs, a little noise can be handled in post processing, too much will destroy the photo. If you have way too much noise then you have no choice but to increase your shutter speed toward 30 seconds.
  3. Experiment with your settings. Faster shutter speeds will get better curtains, but will require a high ISO. Slower shutter speeds will allow you to blur your curtains into solid blocks of colour (you might like this) but your stars might begin to trail.

 My tips:

TEST SHOT When you get to your location and want to test a composition, or see where the Aurora is and how bright it is (they aren’t always visible to the naked eye), push your ISO as HIGH as you can go, and take a 5 second photo. This allows you to really quickly do a ‘test shot’ before hankering down and setting everything up or wasting 30 seconds of time to find out what you need to know quickly. Once you have done the test shot, have a composition you like and are pointed in the right direction, adjust your settings and get to work. (I do hand held test shots on arrival).

MOVE. It is very tempting to just sit in one place and take 500 photos of the same thing. The Aurora changes every few seconds and it is so exciting, but when you get home and look through those 500 photos and realise you really only have 1 photo, or maybe 2 because they are ALL THE SAME. You’ll slap yourself. (again, trust me 😉 ).

Infinity focus.
Each lens is actually different, and not all lenses focus at infinity on the line or on the infinity symbol (sideways 8). You will need to fiddle with this to work out your sweet spot using trial and error. If you have live view mode on your camera then it is easy to work out your infinity focus point.
–       Flick on live view mode and find a bright star in the sky.
–       Zoom in as far as you can on this star using the + magnification on the live view display (not using your lens).
–       Adjust the focus ring on your lens until the star is pin sharp on your screen.
–       STOP.
Look at your focusing ring and note where the sweet spot is for infinity. Mark it if necessary (I know some people who have scratched this mark in using a Standley knife so they can find it easy in the dark! Ha!) This will always be your sweet spot for infinity focussing for night photography. Always check your focus each time you move location or put your camera in and out of your bag. 🙂

Avoid star trailing  – the 600 rule.
To avoid your stars trailing in your shot, keep the 600 rule in mind. On a full frame camera divide 600 by the focal length of your lens to get the maximum number of seconds that you could have the shutter open before stars trail. For example if you are using a 24mm lens on a full frame camera, then you could open the shutter for 600/24 = 25 seconds without stars trailing. To prevent your stars turning into ‘eggs’, go for 500 instead of 600. If you are using a crop body, then multiply your focal length by the crop factor before calculating. For example a Canon 7D has a 1.6x crop. So a 24mm lens on this camera is 24×1.6 = 38.4. 600/38.4 = 15 seconds maximum shutter length to avoid trailing.

Join the Aurora Tasmania facebook group
To get a heads up on a possible Aurora and to find out about confirmed sighting before getting out of your pyjamas, then this is the place!

Where to photograph an Aurora
People ALWAYS ask me ‘Where should I go to get a good photo of the Aurora’ The VERY simple answer is ‘anywhere away from light pollution that gives you a good view south’. But most of us (including myself) seem to be direction challenged, and unless I saw where the sun rose, I have no idea where East is! So get onto Google maps and suss out some locations. Heading south from the city is good because it puts the city lights behind you. The tried and tested Aurora spotting locations close to Hobart are:

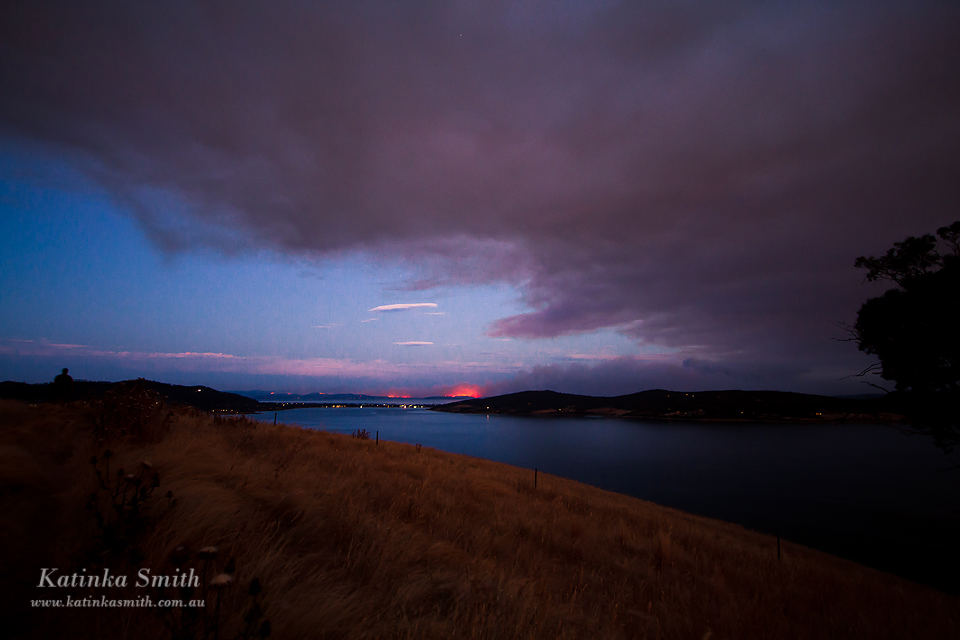
Betsy Island look out at South arm off South Arm Road (July 2012 – x1 class flare):

Aurora pano1

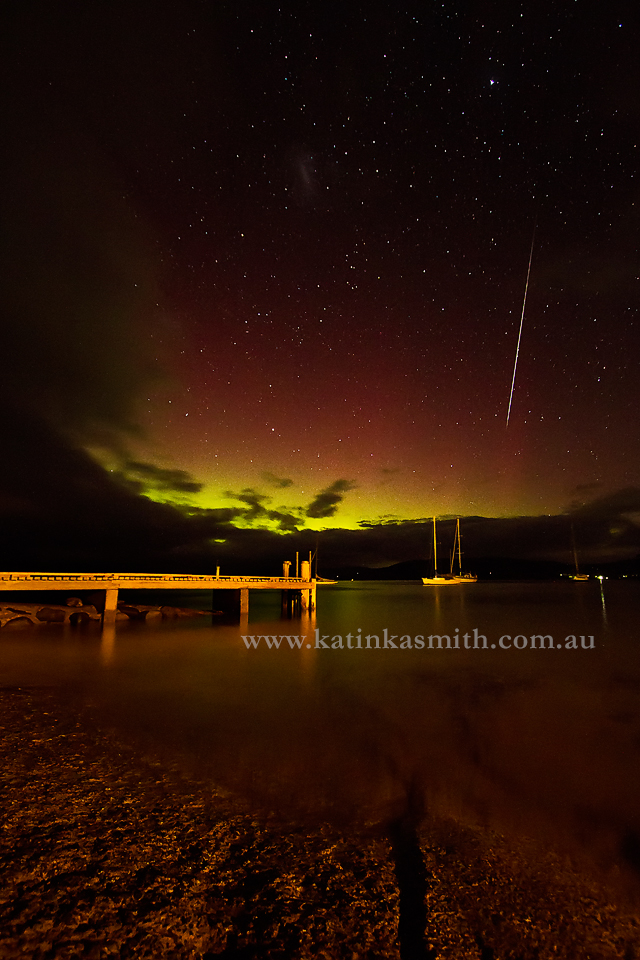
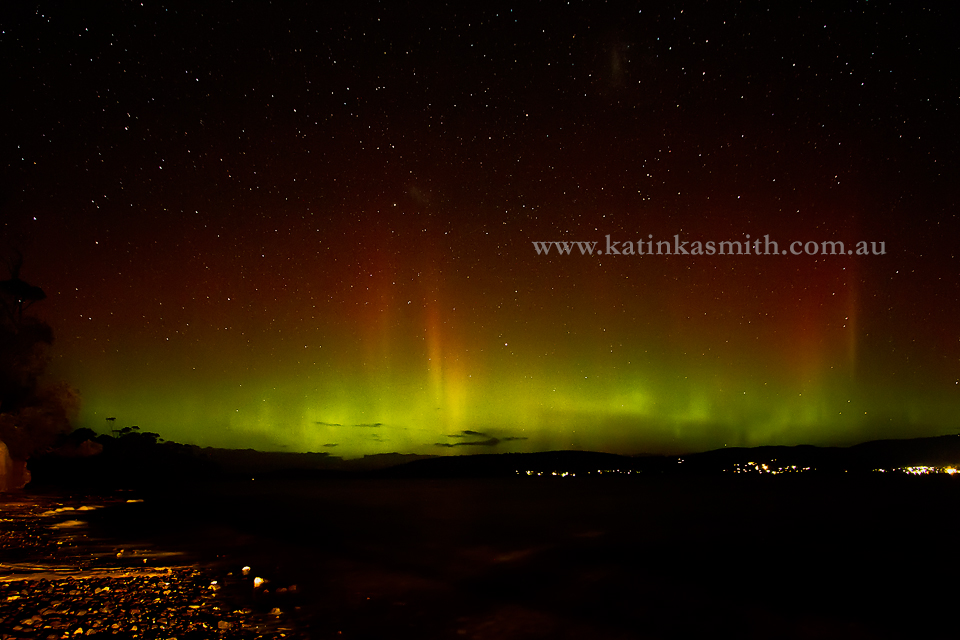
The beach and Jetty at Fergussons Avenue, Tinderbox (18 March 2013, Aurora with meteor):

Aurora and meteor

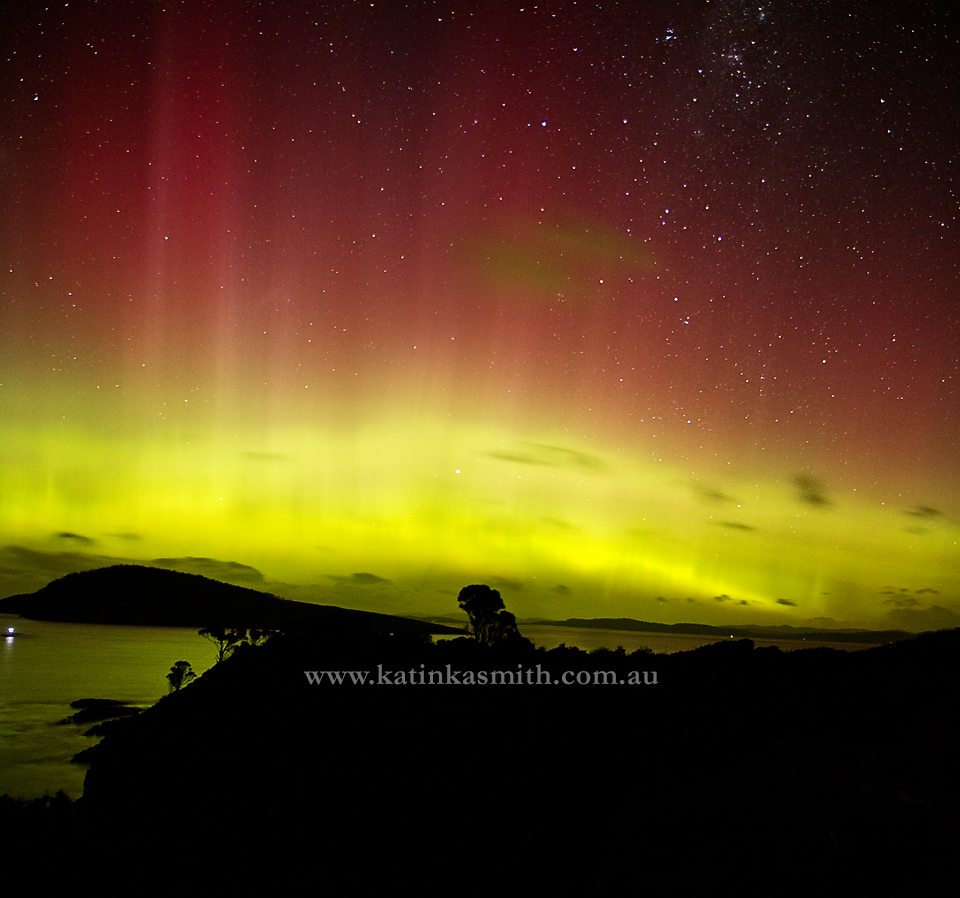
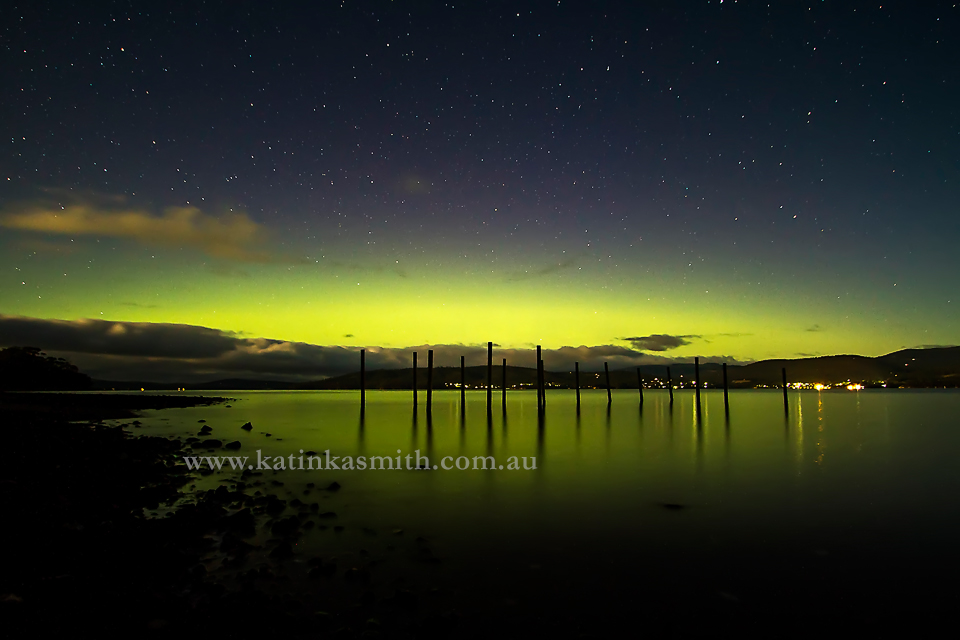
Howden Boat ramp at the end of Wingara Road (1 March 2013):

Aurora 2 March 2013

Howden boat ramp 1 May 2013 (coronal stream)
Aurora Howden

Good luck! Feel free to visit Katinka Smith Photography Facebook and let me know how you went! Or comment below, I would love to hear from you all! If you have any questions then please feel free to ask me 🙂

Katinka

A fiery, smoky sunset. Friday 4 January 2013 | Landscape

Last Friday evening we had a light painting session planned in Hobart with quite a few local photographers. It was just a catch up for a bit of fun and so some could learn a few tricks. As the day wore on and the stifling heat cramped our style and a couple of bushfires got a bit worrying, so we cancelled the session. At a lose end, James from Hitman Photography and myself decided to head out anyway, check out a different location and see what kind of sunset all of this smoke would bring us. Little did we know that these fires would bring a LOT of havoc and destruction, but they would also unearth an extraordinary side of Tasmanians, that I have never seen before! The incredible generosity, help, dedication and general awesomeness that Tasmanian’s have shown in the past week has been incredible! And we have been so blessed that we have no reported fatalities as yet. Truly wonderful and amazing. Thanks to all of those out there on the front line that are fighting hard to save lives and homes.

According to the Mercury, the fires have destroyed or damaged 130 properties and burnt 110,000 hectares of land. The Forcett Fire itself covers 22,800 hectares and at one point it completely isolated the Tasman Peninsula, leaving them without power, mobile phone reception and necessary supplies. To deal with this many people from the general public mobilised their private boats and they shipped in boatloads of donated food, equipment, toiletries and other goods that were donated by the general public to assist their fellow Tasmanians. AMAZING!

There have been 300 career firefighters, 1500-2000 TFS volunteers, 100 personnel staff, 120 personnel from Forestry Tasmania, 158 staff from Parks and Wildlife Service, 75 interstate personnel and 13 personnel from New Zealand fighting these fires. Plus all of the volunteers collecting and distributing donations. It’s been an incredible effort!

If you would like to donate to the bushfire relief then you can do so at http://www.redcross.org.au/

If you or someone that you know was affected by the Hobart bushfires, particularly if you lost your home and your precious photos then I’d like to take this opportunity to inform you about a fabulous group of local photographers that are ‘giving back’ by offering free sessions and free images on a disc to those that lost their photos in the fires. It’s not much, but it is what we can do to help out. Photos are often the first thing we imagine that we will grab ‘on our way out’, it’s very sad that many have lost their precious memories. You can find this group on Facebook here: http://www.facebook.com/PhotographersGivingBack

So, without further ado here are some photos from our sunset session on Friday evening. Please note that I am not generally a landscape photographer and so don’t have the necessary equipment to get results that would be required to create images that could be printed large under these conditions. The settings used to capture a lot of these scenes (particularly the really dark ones) leave the image slightly grainy and noisy. So these images are not for sale, they are simply a way of documenting one aspect of the bushfires by showing the smoky colourful sunset it gave us on Friday. They are edited as well of course, editing landscape images is very different to editing portraits, so I a still finding my way. The sunset was beautiful to be honest, but it is such a shame that such beauty comes at the cost of such devastation.

Katinka x

Smoke from the Lake Repulse fire over Mt Wellington, Hobart
IMG_0664_Sunset IMG_0674e

James atop a hill. See I like landscapes, but I’ll always be a portrait photographer :pIMG_0702_Sunset copy

IMG_0715_Sunset-2

Smoke from the Lake Repulse fire over HobartIMG_0731_Sunset

IMG_0749_Sunset-2

IMG_0754_Sunset-2

IMG_0755_Sunset-2

Forcett Fire burning in the distance.IMG_0759_Sunset

Choosing a favourite photo of a favourite subject! Settlers Cottage, Burra, South Australia

Well, I’m on holidays and it’s lovely! I’m visiting my family spread all over South Australia. I deliberately brought very little with me in the way of editing software so that I would focus on holidaying and seeing family than working! Of course I have cracked a LITTLE bit. I have been taking happy snaps of my family but also throwing in some landscape photography for fun when I can. So while I can’t get right into my editing like I want to, i’m sorting, culling and narrowing down my favourites to edit when i get home and wouldn’t you know it I have TEN favourites of my favourite house!

This house is located just outside of Burra in South Australia. It’s a great little house, right on a main highway, so easy to spot and get to. I had a grand total of 10 minutes to spend photographing this house, I wish I could have stayed longer because some nice clouds rolled in as I had to leave. You have probably seen this house before. It has been photographed a LOT. Probably the most famous photo of this cottage would be the one on the cover of the Midnight Oil album ‘Diesel and Dust’. The wonderful Pete Dobre has also captured some magnificent shots of this house. Check him out if you haven’t already! He’ll rock your socks!

So here’s a couple of favourites that I have to share. I’d love to hear which one is your favourite! I cannot believe that I had no clouds for these images. It was raining and horrible on our way to Burra in the morning, so I thought for SURE I would have some really interesting cloudy skies by the time I got to photograph this house, but no, it had totally cleared up! ARGH!

This first shot is a dodgy mobile phone photo while driving to Burra Wednesday morning…I was sure we were in for a shocking day! Surprisingly it cleared and all of this cloud pretty much VANISHED!

can you believe it was the same day!

Aurora Australis, Tasmania, 15 July 2012 | Hobart Photographer

I awoke Friday morning to an alert on my phone from the Solaris Alpha app (Android) to find that there had been a massive X1.4 class solar flare at around 2.30am. This is exciting, X is top of the class when it comes to solar flares, they are major events and can cause long lasting geomagnetic storms. The X1.4 solar flare came from sunspot 1520, which is the largest sunspot that we have seen in recent years, what’s more, it was pointed directly at earth. I tracked the news of the solar flare over the next few days. I source most of my information from www.spaceweather.com. The CME (coronal mass ejection) that followed the solar flare eventually hit earth on Sunday morning at around 4am.

At first it’s effects appeared to be minimal. The Earth’s magnetic field registered a sharp hit, but everything appeared to return to normal within a few minutes. At 8.30am I headed out the door to my client portrait sessions for the day. A lovely 4 month old baby and his family and a maternity session for the lovely Lisa. I completely expected all the good Aurora stuff to happen during our daylight hours – typical! Nothing exciting was reported all day and then at around 4pm things started to get interesting. I arrived home from my final session of the day, dropped my gear, got changed and reported to my fabulous husband, that I was indeed going out again. The Aurora was happening, it was pouring with rain, but I wasn’t going to risk not being around to photograph it if we got a break in the weather. Plus I bought a new Manfrotto tripod on Friday, expecting to use it on the weekend! And I was determined to make it worth my while spending an extra $100 to buy it local and NOW by using it ASAP.

I picked up my friend Kelly on the way and we decided to try a close by location, with zero success, so instead we headed quickly to a spot that we both knew well in South Arm – tonight was not the night to go scouting out a new location! As we drove through Howrah we could see the curtains of the Aurora shimmering above us. We were SUPER excited! We arrived at South Arm look out to find the carpark FULL of cars – we are usually the only ones out here! ha! We were instantly rewarded with our efforts, the rain stopped almost immediately, we set up our gear and straight away the curtains of the Aurora started rippling across the sky. The images below include single frame images and also multiple frames manually blended together to create wide panoramas.

Most of these are taken at around 20 seconds, F4 and 2000 ISO. You won’t see the colours with your eyes but they will show up in your photos. Happy Aurora Hunting!

Astrblogger Ian Musgrave is a regular on our Aurora spotting facebook group and shares excellent advice and tips. Check out his blog of this Aurora event complete with links to other photos. http://astroblogger.blogspot.com.au/2012/07/images-from-aurora-of-15-and-16-july.html

All images copyright Katinka Smith.
http://www.katinkasmith.com.au/